PSX - Part 1: The Callingpsxpsx-game2022-11-15
So in the not-so-recent past, I’ve become increasingly more interested in developing games for old game consoles. A while ago I found out about the psx crate, which allows you to build games for the first PlayStation (PSX) in rust. As a long time Rustacian, this naturally piqued my interest. Unfortunately the crate is incomplete, and is missing many necessary features, such as doing geometry calculations using the Geometry Transformation Engine (GTE). Not to be deterred, I scoured the source code to figure out how the crate compiles Rust code into a PSX executable, and from there I followed the excellent, though unofficial, PSX documentation by nocash to fill in the gaps. How far did I get? Well, far enough to render the famous hello triangle. We will not go as far in this post, since that would make it ridiculously long, but the hello triangle is gonna be one of our big milestones for this series.

The source code for this project can be found on my GitHub xoddiel/psx-game. This specific post relates to code tagged as blog/part-1.
One thing I’d like to mention: it appears that nocash (Martin Korth) is currently homeless in Hamburg (see the bottom of their original documentation). Without their work, this project wouldn’t have been possible. If you want to help them out, here is their patreon.
PSX crate
Before I get into the meat of things, let me motivate my choice of the programming language for this series. We will be building a PSX game using the rust programming language. Why rust? Well, to quote Mark Rendle:
Rust is very close to being the perfect language.
Basically, the language is safe, fast, low-level and comprehensive. You can learn the basics of rust here, and install it by following the instructions here. Make sure to install the nightly toolchain, since we need a few unstable features to make this all work. I will try to explain everything that I’m doing, but I will also not spend too much time on explaining the basics of programming and whatnot. I will also be assuming that you are doing everything on a linux-based system, although you should be able to do everything on Windows as well. With that in mind, let’s begin!
Let’s first create our binary crate:
> cargo new --bin --vcs none psx-game
	Created binary (application) `psx-game` package
This should create two files in the psx-game directory: Cargo.toml and src/main.rs. The first is used by cargo, the rust build system, to determine how to build our project. The second is the main source file of our program. Unfortunately, though quite reasonably, neither rust nor LLVM (rust’s default compiler backend) have a native support for PSX executable files, so we will have to create a few more files that will define our compilation target.
First we have to create a target specification file. This is a simple JSON file that describes the target system (size of memory addresses, the target triplet, CPU features, etc.). Here we will borrow a file from the aforementioned psx crate, specifically mipsel-sony-psx.json.
{
	"arch": "mips",
	"cpu": "mips1",
	"data-layout": "e-m:m-p:32:32-i8:8:32-i16:16:32-i64:64-n32-S64",
	"env": "psx",
	"exe-suffix": ".exe",
	"executables": true,
	"features": "+soft-float",
	"linker": "rust-lld",
	"linker-flavor": "ld.lld",
	"llvm-abiname": "o32",
	"llvm-args": [
		"-mno-check-zero-division"
	],
	"llvm-target": "mipsel-sony-psx",
	"max-atomic-width": 0,
	"panic-strategy": "abort",
	"pre-link-args": {
		"ld.lld": [
			"--oformat=binary"
		]
	},
	"relocation-model": "static",
	"target-pointer-width": "32",
	"vendor": "sony"
}
Now we have to tell cargo that we want to build code for this target and not our native system. We can do this in multiple ways, but the easiest way is to create a file called .cargo/config.toml and set the build.target property:
[build]
target = 'mipsel-sony-psx.json'
Errors extravaganza
When we now attempt to compile our project, using the cargo build command, we will get an error: can't find crate for `std`. The std crate is rust’s standard library. What the compiler is trying to tell us here is that there is no standard library available for our mipsel-sony-psx target. We have to either instruct cargo to build it or go download it prebuilt off of the internet. We will however choose option #3. We will tell rust that our program does not depend on the standard library. In fact, it cannot. That’s because the standard library expects an operating system to interact with. It expects a memory allocator, file system, network, threads and more. We unfortunately do not have such nice things on the PSX. We only get what we make ourselves.
Since we cannot use the std crate, we will downgrade to its stripped down version, core. This is done by adding a #![no_std] file attribute at the beginning of the main.rs file. Let’s do that and run build again:
#![no_std]

fn main() {
	println!("Hello, world!");
}
Running cargo build again, we get another error message: can't find crate for `core`. Damn, seems like we just exchanged one problem for another. But recall to what I said about std:
We have to either instruct
cargoto build it or go download it prebuilt off of the internet.
We haven’t told cargo to build the core library, so let’s do that. We just need to add a few more lines to our .cargo/config.toml file.
[build]
target = 'mipsel-sony-psx.json'

# ======== NEW LINES ========
[unstable]
build-std = ['core']
build-std-features = ['compiler-builtins-mem']
In build-std we tell cargo that we want to rebuild the core library alone, and we additionally tell cargo that we want the compiler-builtins-mem feature enabled. This feature provides the basic memory functions you might know from C such as memcpy, memset, etc.
Alright, we told cargo to build for our custom target, and we told it to rebuild and use the core library instead of the bundled native std crate. That should be enough to get our code going, right? Well, let’s see!
> cargo build
	Compiling core v0.0.0
	Compiling compiler_builtins v0.1.82
	Compiling rustc-std-workspace-core v1.99.0
	Compiling psx-game v0.1.0
	error: cannot find macro `println` in this scope
	 --> src/main.rs:4:5
	  |
	4 |     println!("Hello, world!");
	  |     ^^^^^^^
	error: `#[panic_handler]` function required, but not found
	error: could not compile `psx-game` due to 2 previous errors
Sigh, what now?! Alright, so rust is complaining that it can’t find the println! macro, and it also demands that we add something called a panic_handler. Hmm, well when you think about it, the first one makes sense. We are not compiling with std, but with core, so maybe println! is part of the standard library? Let’s check the documentation of the core library. Sure enough, when you search for println, you’ll see that it’s in the std module. So, why isn’t it available in core? Well not every platform has a console, so rust wouldn’t know where to write your output. In fact, PSX itself doesn’t have a console. The GPU barely knows how to fill a triangle, much less how to type text. Well, PSX does have a console in a way, but we will talk about that in the next chapter. So let’s for now just comment out that line and carry on.
#![no_std]

fn main() {
	// TODO: println!("Hello, world!");
}
The second error complains that we are missing a panic_handler. This problem is in a similar vein as our nonexistent console issue. A panic is just rust’s version of fatal errors. Kind of like an uncaught exception in other languages. A panic handler is just a name for a function that is called when you use the panic! macro. The error tells us that rust does not know how we want our panics to be handled. So let’s define the simplest possible panic handler.
#![no_std]

use core::panic::PanicInfo;

#[panic_handler]
fn on_panic(_info: &PanicInfo) -> ! {
	loop {} // equivalent to `while true {}` but nicer
}

fn main() {
	// TODO: println!("Hello, world!");
}
Right, so there are a few things worth noting here. First, the PanicInfo argument. You might’ve been expecting a string here, but when we use the panic! macro, rust will actually bundle a little bit more information with our error than just the message, such as the file where the panic was raised. All that metadata is bundled into this PanicInfo structure. Next, this funny ! return type. That’s an operator right, not a type?! Well, it’s something called the never type. When you check it’s documentation, you’ll find that:
!represents the type of computations which never resolve to any value at all. For example, theexitfunctionfn exit(code: i32) -> !exits the process without ever returning, and so returns!.
Alright, so I don’t think this is the clearest example they could’ve chosen, but I think it will become more understandable when we check one of the rust book articles on panic!:
When code panics, there’s no way to recover.
Ah, nice and simple! When we panic!, that’s it. We should never ever return to the code we were executing. That’s what the never type is communicating here. We will never return from the panic handler function. In fact, as you can see, we immediately enter an infinite loop. There is a little bit more complexity to panic!, because of stack unwinding, but we won’t get into that right now.
Alright, so we told cargo to build for MIPS, we are linking against the core library, we removed a macro that doesn’t exist and added a custom panic handler. That has to be it, right? Unfortunately, when we run cargo build we will run into yet another problem: requires `start` lang_item. This one actually wins today’s prize for the most cryptic error message. To understand what is going wrong, we will have to take a little detour through the land of linking.
Linking Park
Generally speaking, when transforming source code into an executable binary, there are three main players: a compiler, an assembler and a linker. Compiler takes in source code, preforms a series of simplification passes, type checking, borrow checking, and emits a series of very low-level instructions. In our case, the compiler is rustc. Assembler then takes those instructions and encodes them into binary. That’s basically what LLVM does in our case. Finally, the linker takes all of our functions and variables and links them into a single executable binary. This is also generally done by LLVM.
The linker, while seemingly simple at a glance, is a whole world of complexity on its own. It has to resolve references between objects, figure out their addresses in RAM, find the entry point of our binary, and do many other things. Our error arises in the last point I mentioned. What rust is trying to tells us here is that there is no entry point. Now, you might say, “But Xoddiel, the main function is like right there!” And you are right, so what gives?
Well, I think I should let you in on a little secret kept from you by compiler manufacturers for generations. The main function is actually not the entry point of executable binaries. When you compile a C program, the compiler actually adds in a magical function, often times called _start. Ever wondered who initializes your static variables? Well, if they are uninitialized, they will make use of something called the .bss section. But sometimes, initialization of your static variables has some logic to it. In those cases the code is wrapped into a function and added to something called the constructors table (.ctors). Similar thing happens with destructors, which are kept in their own table (.dtors). The _start function calls our constructors one-by-one, then calls our main function, and then finally calls all the destructor functions before the binary exits. Where does this magic function come from? Well, the linker implicitly links in a file called crt0.o, provided by your compiler system, which contains this function.
With that in mind, thinking back to our problems with the standard library, can you guess what our problem here is? There is no crt0.o file available for our target on our system. We will thus have to provide it ourselves. Furthermore, the linker has no idea into which bits of RAM should our code be loaded, where should our stack be, nor does it know how to produce the PSX executable file format.
Right, so let’s finally create our PSX binary. First, we will add something called a linker script. It defines how the linker should structure our output file, which parts of the RAM will our objects be loaded into and some other little things. We will again steal borrow some code from the psx crate. Specifically a file called psexe.ld located in psx/. You can just copy it into the root of your project, but note that I’ve modified it a bit in our example here. Namely, I’ve renamed the two occurrences of __start to _start (with just one underscore).
/* some constants defining our address space */
RAM_BASE    = 0x80000000;            /* this is the start of our main memory segment */
RAM_SIZE    = 2M;                    /* PSX has 2 MiB of RAM */
BIOS_SIZE   = 64K;                   /* PSX reserves the lower 64 KiB of RAM for BIOS/kernel */
HEADER_SIZE = 2K;                    /* PSX EXE files must start with a 2 KiB header */
LOAD_ADDR   = RAM_BASE + BIOS_SIZE;  /* address where our binary will be loaded (0x80010000) */
STACK_INIT  = RAM_BASE + 0x001FFF00; /* the top of our stack (remember, stack grows downwards) */

/* the layout of our memory */
MEMORY {
	HEADER    : ORIGIN = LOAD_ADDR - HEADER_SIZE, LENGTH = HEADER_SIZE
	RAM (rwx) : ORIGIN = LOAD_ADDR, LENGTH = RAM_SIZE - (LOAD_ADDR - RAM_BASE)
}

/* the true entry point of our executable */
ENTRY(_start)

/* here we tell the linker how should the file be filled with data */
SECTIONS {
	/* this is our PSX EXE header */
	.psx_exe_header : {
		/* magic number (ASCII string "PS-X EXE") */
		BYTE(0x50); BYTE(0x53); BYTE(0x2d); BYTE(0x58);
		BYTE(0x20); BYTE(0x45); BYTE(0x58); BYTE(0x45);

		/* 8 unused bytes */
		QUAD(0);

		/* our entry point */
		LONG(ABSOLUTE(_start));

		/* intial value of global pointer (I don't think this is used by Rust) */
		LONG(_gp);

		/* address where our binary gets loaded to */
		LONG(LOAD_ADDR);

		/* number of bytes that should be loaded (after this header) */
		LONG(__bss_start - __text_start);

		/* 16 unused bytes */
		QUAD(0); QUAD(0);

		/* stack base pointer */
		LONG(STACK_INIT);

		/* initial stack offset */
		LONG(0);

		/* 24 unused bytes */
		QUAD(0); QUAD(0); LONG(0);

		/* region indicator (North America, Europe, Japan) */
		KEEP(*(.region));

		/* alignment to 2 KiB */
		. = ALIGN(HEADER_SIZE);
	} > HEADER

	/* here is where our code lives */
	.text : {
		__text_start = .;

		/* our constructors table */
		__ctors_start = .;
		,*(.ctors*)
		__ctors_end = .;
		ASSERT((__ctors_end - __ctors_start) % 4 == 0, "Invalid .ctors section");

		/* our destructors table */
		__dtors_start = .;
		,*(.dtors*)
		__dtors_end = .;
		ASSERT((__dtors_end - __dtors_start) % 4 == 0, "Invalid .dtors section");

		/* the majority of our code */
		,*(.text*)

		__text_end = .;
	} > RAM

	/* this is where all of our static variables, strings, etc. live */
	.data : {
		__data_start = .;
		,*(.data*)
		,*(.rodata*)
		,*(.got)

		/* padding to a multiple of 2K is required for loading from ISO */
		. = ALIGN(2048);
		__data_end = .;
	} > RAM

	/* this is that uninitialized .bss section, I was talking about */
	.bss (NOLOAD) : {
		__bss_start = .;
		,*(.bss*)
		,*(COMMON)
		__bss_end = .;
	} > RAM

	/* make the heap word-aligned */
	. = ALIGN(4);
	__heap_start = .;

	/* drop all sorts of useless metadata */
	/DISCARD/ : {
		,*(.MIPS.abiflags)
		,*(.reginfo)
		,*(.eh_frame_hdr)
		,*(.eh_frame)
	}
}
I won’t go into too much detail about what we are defining here, but let me just quickly explain a few of the statements. You can read the entire SECTIONS statement like a recipe telling the linker what to write into the final file. Every statement either appends some data, adds padding for alignment, or stores the current address into a variable. All the lines like NAME = value; are just variables. They make our file easier to read and are in no shape or form reflected in our binary. Exception being all the lines like NAME = .; in our SECTIONS statement. These lines tell the linker where different symbols are linked to. For instance __ctors_start = .; tells the linker that the symbol __ctors_start is located at the current address (that’s what that . means). We will use these symbols later in the series.
QUAD(0) and LONG(0) tells the linker to write 8 zero bytes and 4 zero bytes respectively. MEMORY tells the linker what sections of the address space are available on the target machine. We tell the linker that there is some file header, but also that there is an rwx (readable, writable and executable) section of memory right after the BIOS reserved part of RAM, where the linker can map our symbols.
Finally we are ready to go back to rust and implement our magic _start function. Well, after we tell rustc to use our linker file. We do that by editing the .cargo/config.toml file once more:
[build]
target = 'mipsel-sony-psx.json'

[unstable]
build-std = ['core']
build-std-features = ['compiler-builtins-mem']

# ======== NEW LINES ========
[target.mipsel-sony-psx]
rustflags = ['-Clink-arg=-Tpsexe.ld', '-Clink-arg=--oformat=binary']
Here we are telling rustc to use our linker script and to link our binary into a flat file (not ELF or PE). Now let’s implement our true entry point. We will leave out constructors and destructors for now.
#![no_std]
#![no_main]

use core::panic::PanicInfo;

#[panic_handler]
fn on_panic(_info: &PanicInfo) -> ! {
	loop {} // equivalent to `while true {}` but nicer
}

#[no_mangle]
extern "C" fn _start() -> ! {
	main();

	loop {}
}

fn main() {
	// TODO: println!("Hello, world!");
}
Let’s quickly go over all the changes. Well first off, we’ve added a non-returning function _start, that calls our main function and then enters an infinite loop. This function is marked with #[no_mangle] which tells rust not to mess with the name of the function. We define our function as extern "C", which is a bit more tricky to explain. Basically, different architectures and even different operating systems have different conventions for how functions are called. This is called the target’s ABI. By default, rust uses the Rust calling convention. It’s not a specific calling convention, rust may change it as it pleases, but it is one that is guaranteed to be used by all non-extern rust functions. However, when BIOS (we will talk about that next time) calls our _start function, it will do that using the C calling convention for MIPS. Thus we tell rust to make the function compatible with that calling convention. Finally, the #![no_main] attribute tells Rust that it should not expect the system to provide a start function, as we define it ourselves. And that’s it!
Alright, that must be it, right?! We’ve defined our own compilation target, we’ve rebuilt the core library for our target, we’ve defined all the missing symbols, and we’ve told the linker how we want our final binary structured. Let’s take a deep breath, and run the compilation:
> cargo build
	Compiling core v0.0.0
	Compiling compiler_builtins v0.1.82
	Compiling rustc-std-workspace-core v1.99.0
	Compiling psx-game v0.1.0
	 Finished dev [unoptimized + debuginfo] target(s) in 9.53s
Would you look at that! We’ve finally compiled our PSX program! You can find it at this path: target/mipsel-sony-psx/debug/psx-game.exe.
Reaping the fruits of our labour
Now that we have a PlayStation executable, how do we run it? Well, you can pick almost any PSX emulator you want, but I will use mednafen. I’m choosing it for it’s emulation accuracy and a pretty decent debugger. Now, here we get into the part where I have to tell you that you may only use a PSX emulator, if you yourself have dumped the PlayStation BIOS off of a console that you yourself own. I do not condone piracy.
I would also like to point out that this might not work for everybody with every emulator. That’s because we are not providing the PSX region string, which might cause some BIOSes to reject the binary. We will fix that in the next part.
After setting everything up, you can just run mednafen target/mipsel-sony-psx/debug/psx-game.exe. You should be greeted with an empty window (perhaps with a warning message at the bottom). This makes sense, as all our program does is loop indefinitely. But how can we check that we have booted into our program successfully? Well, there are multiple ways.
One way is to add a line to our program, that will write into an invalid part of the address space (make sure the address is 4-byte aligned). This should trigger an error message in the mednafen log, and you should be able to recognize the memory address you’ve chosen. This should theoretically work with any PSX emulator, as long as it has a log. For example, let’s add the following line to our main function:
#![no_std]
#![no_main]

use core::panic::PanicInfo;

#[panic_handler]
fn on_panic(_info: &PanicInfo) -> ! {
	loop {} // equivalent to `while true {}` but nicer
}

#[no_mangle]
extern "C" fn _start() -> ! {
	main();

	loop {}
}

fn main() {
	// TODO: println!("Hello, world!");
	unsafe { core::ptr::write_volatile(0x00FFFFF0 as *mut usize, 0xDEADBEEF); } // NEW LINE
}
I will explain what the unsafe keyword and the write_volatile function do in the next chapter, but for now let’s compile it and run our program. We will find the following line in the mednafen log:
[MEM] Unknown write32 to 00fffff0 at time 601892, =deadbeef(-559038737)
It works! Our program is definitely being executed. We can also check that using the mednafen debugger. Let’s remove the change we made before, rebuild and run our program again. Now press ALT + D to enter the debugger and then press S to pause the execution.
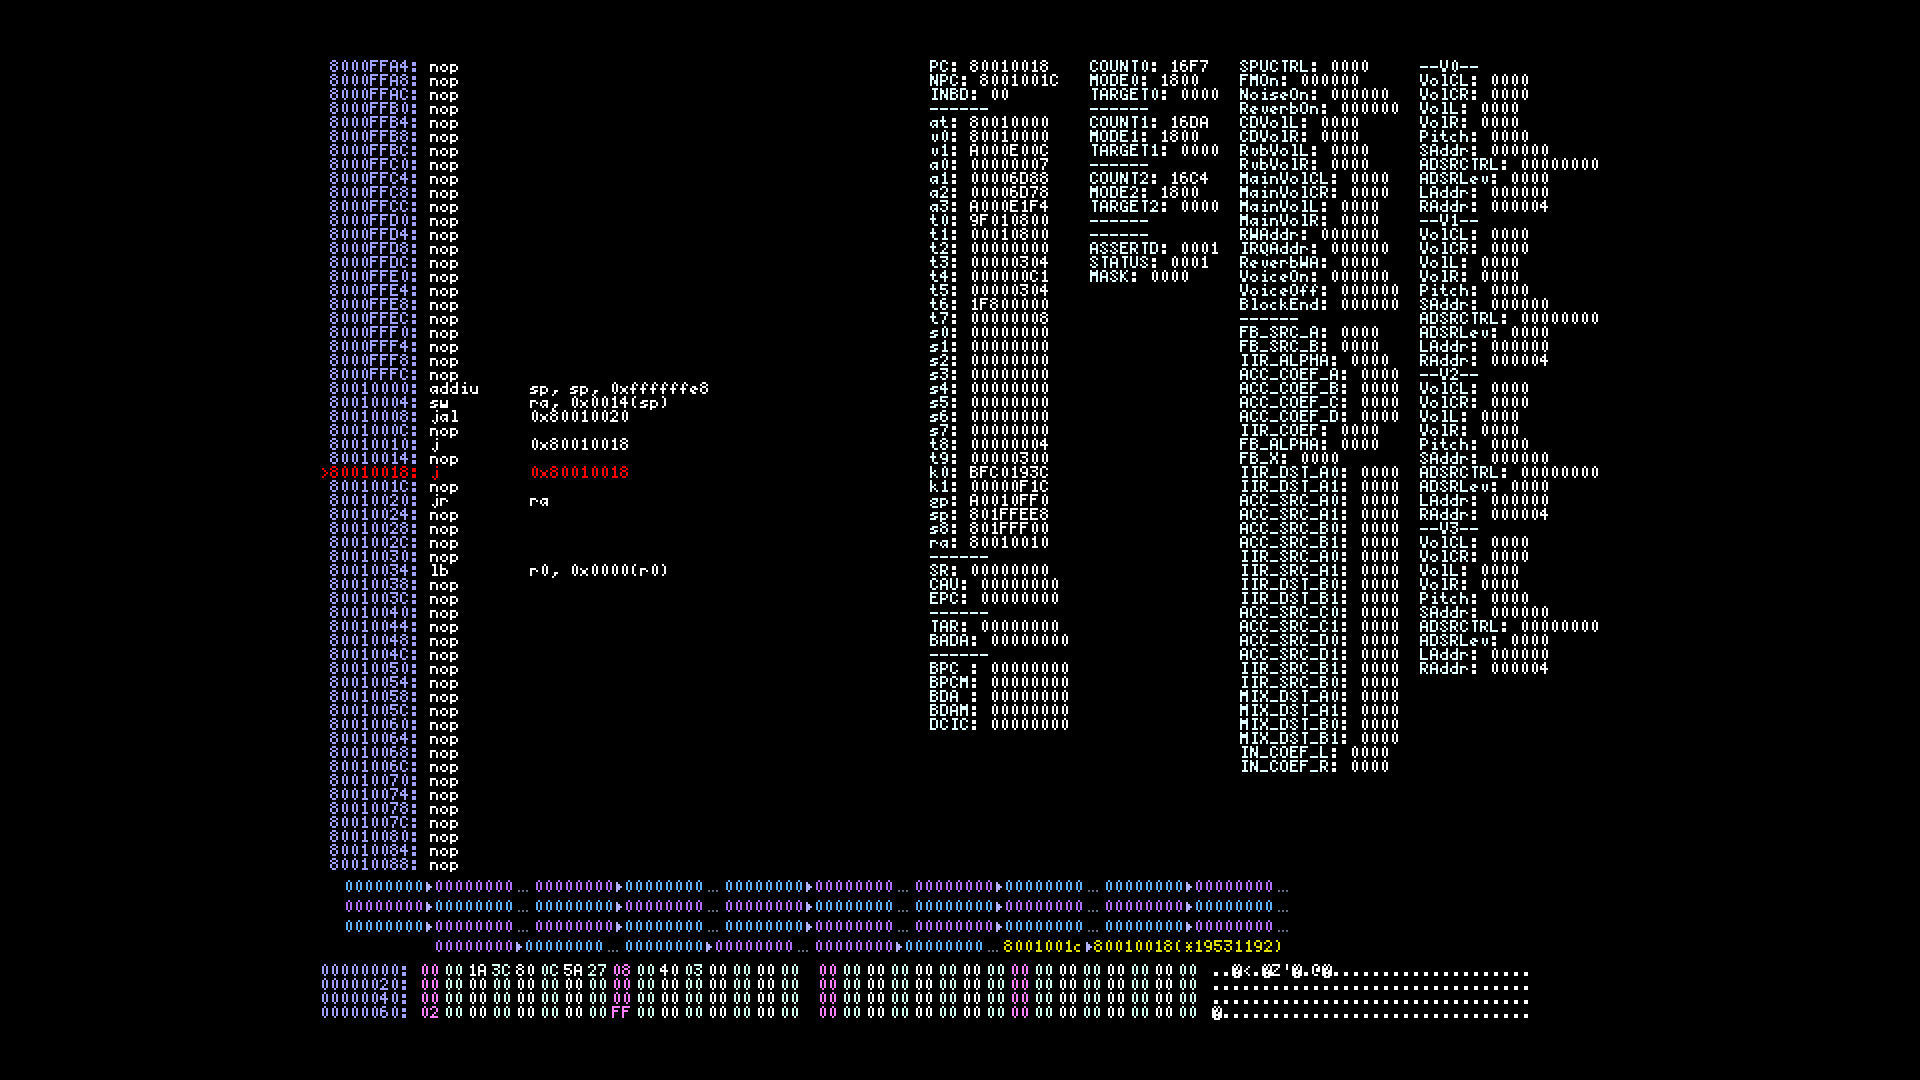
You can see a bunch of information on the screen, but we are mostly interested in the instructions and their addresses on the left. As you can see, there is a whole bunch of nop instructions up until address 0x80010000. These nop instructions correspond to zero bytes, and they are precisely the end of the BIOS reserved memory. If you go back to our linker script, you can verify that 0x80010000 is the address we told our linker to load our program at. So it seems we are in our code. But to be absolutely sure, let’s look at the assembly we get.
80010000:	addiu sp, sp, 0xffffffe8 ; this is our `_start` funciton
80010004:	sw ra, 0x0014(sp)        ; this sets up our stack frame
80010008:	jal 0x80010020           ; here we call our `main`
8001000C:	nop                      ; branch delay slot (a quirk of MIPS)
80010010:	j 0x80010018             ; this is some bug in how LLVM emits instructions
80010014:	nop
80010018:	j 0x80010018             ; and this is our infinite loop (notice it jumps to itself)
8001001C:	nop
80010020:	jr ra                    ; this is our `main`, which immediately returns
80010024:	nop
Well, that’s definitely our code! We can see the call to our main (at 0x80010008) which immediately returns (at 0x80010020) and then our infinite loop at 0x80010018, signified by an instruction that jumps to its own address. Notice the nop instructions underneath the jump instructions. These are instructions in so called branch delay slots. They, along with their siblings, the load delay slots, are a quirk of the MIPS architecture, and will become important later in the series. You won’t find them in modern computers, but back in the day, these allowed the hardware to be quite a bit simpler. You might also notice that weird jump instruction at 0x80010010. I myself am not entirely sure what is going on there, but I believe it is a bug in how LLVM compiles its intermediate form into MIPS instructions. I see no reason for it to be there, unless maybe some kind of weird timing insurance. No idea.
Profit!
And that’s it! We’ve successfully created a rust program that runs on PlayStation! Pat yourself on the back and go get yourself a cookie. You deserve it! We will expand upon our program quite a bit in the next few chapters, starting with adding the println! macro that we need to complete our hello world program. Now, one last thing that I would like to leave you with is a way to run your PSX program in mednafen whenever you invoke cargo run. You can do this by adding the following line to our .cargo/config.toml file:
[build]
target = 'mipsel-sony-psx.json'

[unstable]
build-std = ['core']
build-std-features = ['compiler-builtins-mem']

[target.mipsel-sony-psx]
rustflags = ['-Clink-arg=-Tpsexe.ld', '-Clink-arg=--oformat=binary']
runner = ['mednafen'] # NEW LINE
Now when you invoke cargo run in console or in your IDE, the binary should be built and executed in mednafen automatically. Quite handy!
From here on, I would like to encourage you to play around a bit! Exploration is the best way to learn new things, after all. With some help form the PSX docs, see if you can implement a printing function yourself. You will unfortunately have to make use of the inline assembly macro, asm!, to do that. As a hint, I’ll say that the PSX BIOS implements a whole bunch of standard clib functions (although, some don’t seem to work, so watch out for that).
Oh, and just a reminder, all of the source code for this part of the project can be found here.